¿Cómo exportar todas las imágenes de una hoja de Excel de una sola vez?
Supongamos que tiene muchas imágenes en su libro y desea guardarlas todas en una carpeta específica a la vez. Normalmente, puede copiar y pegar las imágenes una por una manualmente para guardarlas, pero resulta muy lento repetir este proceso continuamente. A continuación, le presento algunos consejos para realizar esta tarea de forma eficiente.
Exportar todas las imágenes de una sola vez desde Excel con la función Guardar como
Con la función integrada de Excel Guardar como, puede guardar un libro como Página web para almacenar todas las imágenes —incluidos gráficos, formas y otros objetos— en una carpeta. Siga estos pasos.
1. Abra el libro que contiene las imágenes que desea guardar. Haga clic en Archivo > Guardar como > Examinar.

2. En el cuadro de diálogo Guardar como, debe:

3. En el cuadro de diálogo Microsoft Excel que aparece, haga clic en el botón Sí.

4. Abra la carpeta donde se guardaron los archivos exportados y encontrará una carpeta y un archivo llamado «Lista de archivos en formato HTML». En esta carpeta se almacenan todas las imágenes del libro, incluidos gráficos, formas y otros objetos.

5. Puede conservar en la carpeta únicamente las imágenes que necesite y eliminar el resto.
Exporte fácilmente todas las imágenes de una sola vez desde Excel con una herramienta increíble
El método anterior extraerá todos los objetos del libro, aunque es posible que algunos no le interesen. Si tiene instalado Kutools para Excel en Excel, su función Exportar gráfico le permitirá guardar únicamente las imágenes que necesite.
1. Haga clic en KUTOOLS PLUS > Importar/Exportar > Exportar gráfico:

2. En el cuadro de diálogo Exportar gráfico, configure lo siguiente:
 para Seleccionar una carpeta y guardar sus imágenes exportadas;
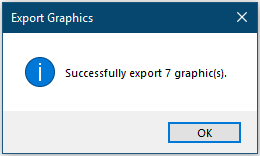
3. A continuación, aparecerá un cuadro de diálogo indicando cuántas imágenes se han exportado correctamente. Haga clic en el botón Aceptar.
Ahora puede ir a la carpeta de destino y comprobar los archivos Exportar Imágenes.
Haga clic en Exportar gráfico para obtener más información sobre esta función.
Antes de usar Kutools para Excel, por favor descárguelo e instálelo primero.
Exportar Imágenes y renómbrelos con los valores de las celdas adyacentes
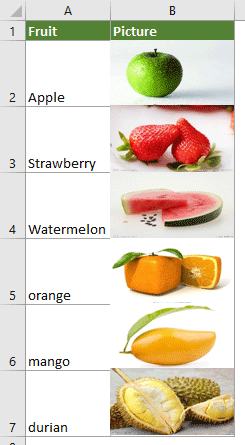
Como se muestra en la captura de pantalla siguiente, hay dos columnas: una contiene una lista de nombres de frutas y la otra, las imágenes correspondientes de dichas frutas. Para exportar estas imágenes y asignarles automáticamente los nombres de las frutas correspondientes, puede probar el código VBA de esta sección.
1. En la hoja de cálculo desde la que desea exportar las imágenes, pulse las teclas Alt + F11 para abrir la ventana de Microsoft Visual Basic para Aplicaciones.
2. En la ventana de Microsoft Visual Basic para Aplicaciones, haga clic en Insertar > Módulo. A continuación, copie el siguiente código VBA en la ventana del módulo.
Código VBA: Exportar imágenes de una columna y asignarles nombres automáticamente
Sub ExportImages_ExtendOffice()
'Updated by Extendoffice 20220308
    Dim xStrPath As String
    Dim xStrImgName As String
    Dim xImg As Shape
    Dim xObjChar As ChartObject
    Dim xFD As FileDialog
    Set xFD = Application.FileDialog(msoFileDialogFolderPicker)
    xFD.Title = "Please select a folder to save the pictures" & " - ExtendOffice"
    If xFD.Show = -1 Then
       xStrPath = xFD.SelectedItems.Item(1) & "\"
    Else
        Exit Sub
    End If

    On Error Resume Next
    For Each xImg In ActiveSheet.Shapes
        If xImg.TopLeftCell.Column = 2 Then
        xStrImgName = xImg.TopLeftCell.Offset(0, -1).Value
        If xStrImgName <> "" Then
            xImg.Select

            Selection.Copy
            Set xObjChar = ActiveSheet.ChartObjects.Add(0, 0, xImg.Width, xImg.Height)
            With xObjChar
                .Border.LineStyle = xlLineStyleNone
                .Activate
                ActiveChart.Paste
                .Chart.Export xStrPath & xStrImgName & ".png"
                .Delete
            End With
        End If
        End If
    Next
End Sub
Notas:
3. Pulse la tecla F5 para ejecutar el código. En la ventana que se abre, seleccione una carpeta para guardar las imágenes y, a continuación, haga clic en Aceptar.

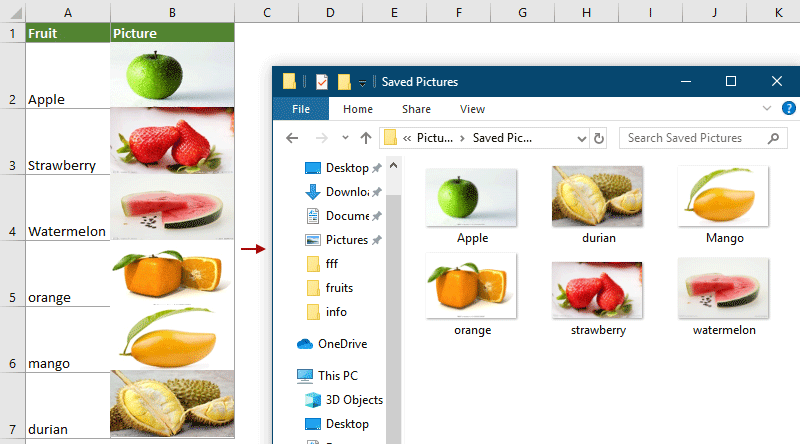
De este modo, todas las imágenes de la columna especificada se exportan y renombran automáticamente con los valores de las celdas adyacentes, tal como ha indicado.
Artículo relacionado:
¿Cómo exportar gráficos a imágenes en Excel?
Las mejores herramientas de productividad para Office
Potencie sus habilidades en Excel con Kutools para Excel y experimente una eficiencia como nunca antes.Kutools para Excel ofrece más de 300 funciones avanzadas para aumentar su productividad y Ahorrar tiempo.Haga clic aquí para obtener la función que más necesita...
Office Tab aporta una interfaz con pestañas a Office y hace que su trabajo sea mucho más fácil
- Active la edición y lectura con pestañas en Word, Excel, PowerPoint, Publisher, Access, Visio y Project.
- Abra y cree varios documentos en nuevas pestañas dentro de la misma ventana, en lugar de hacerlo en ventanas separadas.
- ¡Aumente su productividad en un 50 % y elimine cientos de clics del ratón cada día!
Todos los complementos de Kutools en un solo instalador.
Kutools for Office es la suite que incluye complementos para Excel, Word, Outlook y PowerPoint, además de Office Tab Pro, ideal para equipos que trabajan en distintas aplicaciones de Office.
- Suite integral— complementos para Excel, Word, Outlook y PowerPoint + Office Tab Pro
- Un instalador, una licencia— configuración en minutos (compatible con MSI)
- Rendimiento mejorado en conjunto— productividad optimizada en todas las aplicaciones de Office
- Prueba gratuita de 30 días con todas las funciones— sin registro ni tarjeta de crédito
- La mejor relación calidad-precio— ahorre frente a la compra individual de complementos