¿Cómo crear una lista desplegable con varias casillas de verificación en Excel?
Las listas desplegables tradicionales en Excel limitan al usuario a una única selección. Para superar esta limitación y permitir selecciones múltiples, exploraremos dos métodos prácticos para crear listas desplegables con varias casillas de verificación.
Utilice un cuadro de lista para crear una lista desplegable con varias casillas de verificación
A: Cree un cuadro de lista con Datos de origen
B: Asigne un nombre a la celda donde ubicará el Número de elementos seleccionados
C: Inserte una forma para ayudar a mostrar el Número de elementos seleccionados
Cree fácilmente una lista desplegable con casillas de verificación mediante una herramienta sorprendente
Más tutoriales sobre listas desplegables...
Utilice un cuadro de lista para crear una lista desplegable con varias casillas de verificación
Como se muestra en la siguiente captura de pantalla, todos los nombres del rango A2:A11 de la hoja de trabajo actual se utilizarán como datos de origen para el cuadro de lista ubicado en la celda C4. Al hacer clic en este cuadro, se desplegará una lista de elementos entre los que podrá elegir, y el número de elementos seleccionados aparecerá en la celda E4. Para lograrlo, siga estos pasos:

A. Cree un cuadro de lista utilizando Datos de origen.
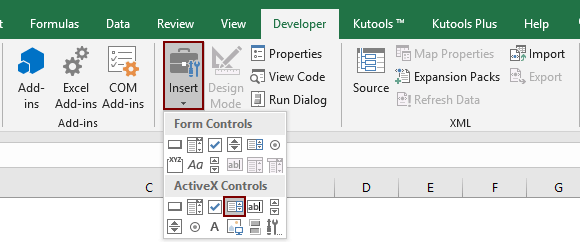
1. Haga clic en Programador > Insertar > Cuadro de lista (control ActiveX). Vea la captura de pantalla:
2. Dibuje un cuadro de lista en la hoja de trabajo actual, haga clic derecho sobre él y seleccione Propiedades en el menú contextual.

3. En el cuadro de diálogo Propiedades, configure lo siguiente:
- 3,1 En el cuadro ListFillRange, introduzca el Rango de origen que mostrará en la lista (aquí introduzco el rango)A2:A11);
- 3,2 En el cuadro ListStyle, seleccione 1 - fmListStyleOption;
- 3,3 En el cuadro MultiSelect, seleccione 1 – fmMultiSelectMulti;
- 3,4 Cierre el cuadro de diálogo Propiedades. Vea la captura de pantalla:


B: Asigne un nombre a la celda donde ubicará el Número de elementos seleccionados
Si necesita mostrar todos los Número de elementos seleccionados en una celda específica, como E4, proceda del siguiente modo:
1. Seleccione la celda E4, introduzca ListBoxOutput en el cuadro Nombre y pulse la tecla Entrar.

C. Inserte una forma para mostrar el número de elementos seleccionados.
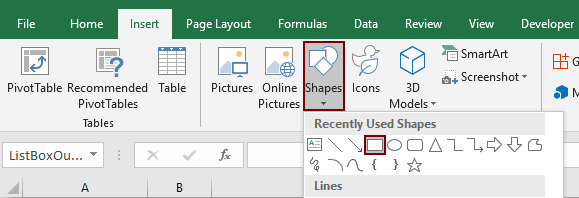
1. Haga clic en Insertar > Formas > Rectángulo. Vea la captura de pantalla:
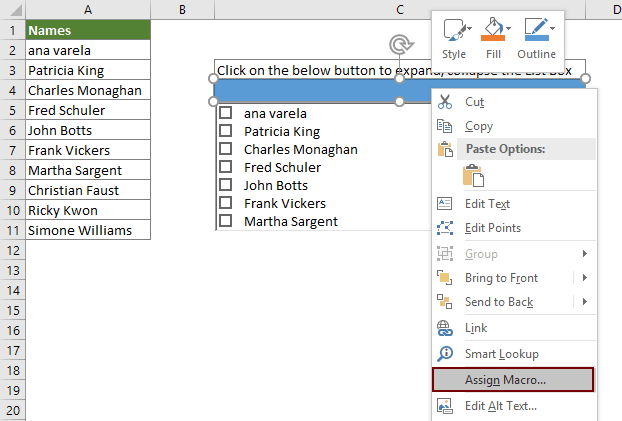
2. Dibuje un rectángulo en su hoja de cálculo (aquí dibujo el rectángulo en la celda C4). A continuación, haga clic con el botón derecho sobre el rectángulo y seleccione Asignar macro en el menú contextual.
3. En el cuadro de diálogo Asignar macro, haga clic en el botón Nuevo.

4. En la ventana abierta de Microsoft Visual Basic para Aplicaciones, reemplace el código original en la ventana del módulo por el siguiente código VBA.
Código VBA: Crear una lista con varias casillas de verificación
Sub Rectangle1_Click()
'Updated by Extendoffice 20200730
Dim xSelShp As Shape, xSelLst As Variant, I, J As Integer
Dim xV As String
Set xSelShp = ActiveSheet.Shapes(Application.Caller)
Set xLstBox = ActiveSheet.ListBox1
If xLstBox.Visible = False Then
    xLstBox.Visible = True
    xSelShp.TextFrame2.TextRange.Characters.Text = "Pickup Options"
    xStr = ""
    xStr = Range("ListBoxOutput").Value

    If xStr <> "" Then
         xArr = Split(xStr, ";")
    For I = xLstBox.ListCount - 1 To 0 Step -1
        xV = xLstBox.List(I)
        For J = 0 To UBound(xArr)
            If xArr(J) = xV Then
              xLstBox.Selected(I) = True
              Exit For
            End If
        Next
    Next I
    End If
Else
    xLstBox.Visible = False
    xSelShp.TextFrame2.TextRange.Characters.Text = "Select Options"
    For I = xLstBox.ListCount - 1 To 0 Step -1
        If xLstBox.Selected(I) = True Then
        xSelLst = xLstBox.List(I) & ";" & xSelLst
        End If
    Next I
    If xSelLst <> "" Then
        Range("ListBoxOutput") = Mid(xSelLst, 1, Len(xSelLst) - 1)
    Else
        Range("ListBoxOutput") = ""
    End If
End If
End Sub
Nota: En el código, Rectangle1 es el nombre de la forma; ListBox1 es el nombre del cuadro de lista; Seleccionar Opciones y Opciones seleccionadas son el texto que se muestra en la forma; y ListBoxOutput es el nombre de la celda de salida. Puede modificarlos según sus necesidades.
5. Pulse simultáneamente las teclas Alt + Q para cerrar la ventana de Microsoft Visual Basic para Aplicaciones.
6. Al hacer clic en el botón rectangular, se contraerá o expandirá la lista desplegable. Cuando esté expandida, seleccione los elementos deseados marcándolos. A continuación, haga clic nuevamente en el rectángulo para que el número total de elementos seleccionados aparezca en la celda E4. Vea la demostración a continuación:
7. A continuación, guarde el libro como un libro habilitado para macros de Excel para poder reutilizar el código en el futuro.
Cree una lista desplegable con casillas de verificación mediante una herramienta sorprendente
¿Harto del complejo código VBA? Kutools para Excel facilita la creación de listas desplegables con casillas de verificación para una selección múltiple sin complicaciones. Ideal para encuestas, filtrado de datos o formularios dinámicos, esta herramienta intuitiva optimiza su flujo de trabajo y le ahorra tiempo.
1. Abra la hoja de cálculo en la que haya configurado la validación de datos de tipo Lista desplegable, haga clic en Kutools > Lista desplegable > Habilitar lista desplegable avanzada. A continuación, vuelva a hacer clic en Agregar casillas de verificación a la lista desplegable en el menú Lista desplegable. Vea la captura de pantalla:
 |  |
2. En el cuadro de diálogo Agregar casillas de verificación a la lista desplegable, configure lo siguiente:
- 2,1) Seleccione las celdas que contienen la lista desplegable;
- 2,2) En el cuadro Separador, introduzca un delimitador que utilizará para separar los elementos múltiples;
- 2,3) Marque la opción Habilitar función de búsqueda según necesite. (Si marca esta opción, podrá realizar búsquedas en la lista desplegable posteriormente.)
- 2,4) Haga clic en el botón Aceptar.


A partir de ahora, al hacer clic en la celda con Lista desplegable, aparecerá un cuadro de lista; marque los elementos Por favor, selecciona activando las casillas de verificación para mostrarlos en la celda, tal como se muestra en la siguiente demostración.
Para obtener más información sobre esta función, consulte este tutorial.
Kutools para Excel: potencie Excel con más de 300 herramientas esenciales, agilice y simplifique su trabajo, y aproveche las funciones de IA para un procesamiento de datos más inteligente y una mayor productividad.Consígalo ahora
Este artículo le ofrece dos métodos para crear fácilmente una lista desplegable con casillas de verificación en Excel. ¡Elija el que mejor se adapte a sus necesidades! Si desea descubrir más consejos y trucos de Excel, nuestra web ofrece miles de tutoriales.
Artículos relacionados:
Autocompletado al escribir en una lista desplegable de Excel
Si tienes una lista desplegable con validación de datos que contiene muchos valores, tendrás que desplazarte hacia abajo en la lista para encontrar el adecuado o escribir directamente la palabra completa en el cuadro. ¡Imagina si existiera un método que autocompletara la opción al teclear solo la primera letra! Todo sería mucho más fácil. Este tutorial te muestra cómo lograrlo.
Crear una lista desplegable desde otro libro en Excel
Es bastante sencillo crear una lista desplegable con validación de datos entre hojas dentro del mismo libro. Pero, ¿qué ocurre si los datos que necesita para la validación están en otro libro? En este tutorial aprenderá, paso a paso, cómo crear una lista desplegable desde otro libro en Excel.
Crear una lista desplegable con función de búsqueda en Excel
Cuando una lista desplegable contiene numerosos valores, encontrar el adecuado puede resultar complicado. Ya presentamos un método para autocompletar la lista al escribir la primera letra en el cuadro. Pero, además del autocompletado, también puedes hacer que la lista sea buscable para localizar valores con mayor eficacia. ¡Descubre cómo lograrlo con el método que te explicamos en este tutorial!
Rellena automáticamente otras celdas al seleccionar un valor en una lista desplegable de Excel
Imagina que has creado una lista desplegable a partir de los valores del rango B8:B14. Al elegir cualquier opción de esa lista, quieres que el valor correspondiente del rango C8:C14 se rellene automáticamente en una celda específica. ¡Los métodos que te mostramos en este tutorial te ayudarán a lograrlo sin complicaciones!
Las mejores herramientas de productividad para Office
Potencie sus habilidades en Excel con Kutools para Excel y experimente una eficiencia como nunca antes.Kutools para Excel ofrece más de 300 funciones avanzadas para aumentar su productividad y Ahorrar tiempo.Haga clic aquí para obtener la función que más necesita...
Office Tab aporta una interfaz con pestañas a Office y hace que su trabajo sea mucho más fácil
- Active la edición y lectura con pestañas en Word, Excel, PowerPoint, Publisher, Access, Visio y Project.
- Abra y cree varios documentos en nuevas pestañas dentro de la misma ventana, en lugar de hacerlo en ventanas separadas.
- ¡Aumente su productividad en un 50 % y elimine cientos de clics del ratón cada día!
Todos los complementos de Kutools en un solo instalador.
Kutools for Office es la suite que incluye complementos para Excel, Word, Outlook y PowerPoint, además de Office Tab Pro, ideal para equipos que trabajan en distintas aplicaciones de Office.
- Suite integral— complementos para Excel, Word, Outlook y PowerPoint + Office Tab Pro
- Un instalador, una licencia— configuración en minutos (compatible con MSI)
- Rendimiento mejorado en conjunto— productividad optimizada en todas las aplicaciones de Office
- Prueba gratuita de 30 días con todas las funciones— sin registro ni tarjeta de crédito
- La mejor relación calidad-precio— ahorre frente a la compra individual de complementos