Outlook: cambiar la carpeta donde se guardan los Elementos enviados
En Outlook, los mensajes de correo electrónico enviados normalmente se guardan automáticamente en la carpeta Elementos enviados. Sin embargo, es posible que prefiera almacenarlos en otra carpeta para mantener una organización más clara y eficiente. Esta guía le revelará sencillos trucos para cambiar la carpeta predeterminada de Elementos enviados, permitiéndole redirigir con facilidad sus correos electrónicos enviados a otras carpetas en Microsoft Outlook.
Cambiar la carpeta en la que se guardan los Elementos enviados mientras está redactando
Cambiar la carpeta en la que todos los Elementos enviados se guardan automáticamente
Cambiar la carpeta en la que se guardan los Elementos enviados mientras está redactando
Al redactar un mensaje de correo electrónico, puede especificar una carpeta alternativa donde se guardará automáticamente tras enviarlo.
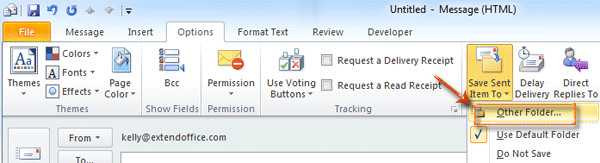
Paso 1: haga clic en Guardar elemento enviado en > Otra carpeta en el grupo Más opciones de la pestaña Opciones de la ventana de mensaje.
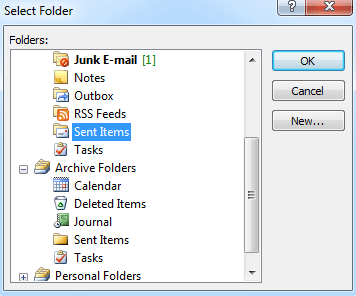
Paso 2: en el cuadro de diálogo Seleccionar carpeta, seleccione y resalte una carpeta en el campo Carpetas: y haga clic en el botón Aceptar.
Tras enviar este mensaje de correo electrónico, se guardará automáticamente una copia en la carpeta que seleccionó en el paso 2.
Asistente de correo con IA en Outlook: respuestas más inteligentes y comunicación más clara (¡magia con un solo clic!)
Simplifique sus tareas diarias en Outlook con el Asistente de correo con IA de Kutools para Outlook. Esta potente herramienta aprende de sus correos anteriores para ofrecerle respuestas inteligentes y precisas, optimizar el contenido de sus mensajes y ayudarle a redactarlos y perfeccionarlos sin esfuerzo.

Esta función incluye:
- Respuestas inteligentes: obtenga respuestas elaboradas a partir de sus conversaciones anteriores: personalizadas, precisas y listas para usar.
- Contenido mejorado: refine automáticamente el texto de sus correos electrónicos para lograr mayor claridad e impacto.
- Redacción sin esfuerzo: proporcione solo palabras clave y deje que la IA haga el resto, con múltiples estilos de escritura.
- Extensiones inteligentes: potencie sus ideas con sugerencias adaptadas al contexto.
- Resumen: obtenga al instante resúmenes concisos de correos electrónicos extensos.
- Alcance global: traduzca sus correos electrónicos a cualquier idioma con facilidad.
Esta función incluye:
- Respuestas inteligentes de correo electrónico
- Contenido optimizado
- Borradores basados en palabras clave
- Extensión inteligente de contenido
- Resumen de correos electrónicos
- Traducción multilingüe
¡No espere más—descargue ahora el Asistente de correo con IA y disfrute!
Cambiar la carpeta en la que todos los Elementos enviados se guardan automáticamente
En algunos casos, es posible que desee cambiar la carpeta predeterminada de elementos enviados y hacer que todos sus correos electrónicos se guarden automáticamente en una carpeta específica. Le guiaremos paso a paso para lograrlo creando una regla en Outlook.
Antes de crear una regla, cambie a la vista Correo haciendo clic en Correo en Navegación.
Paso 1: abra el cuadro de diálogo Reglas y alertas:
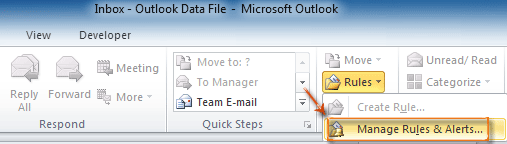
Haga clic en Reglas > Administrar reglas y alertas en el grupo Mover de la pestaña Inicio.
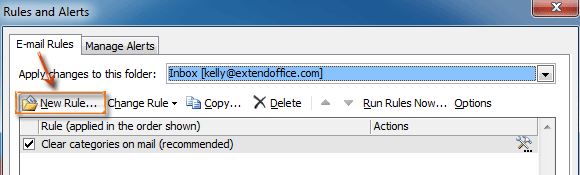
Paso 2: en el cuadro de diálogo Reglas y alertas, haga clic en el botón Nueva regla en la pestaña Reglas de correo electrónico.
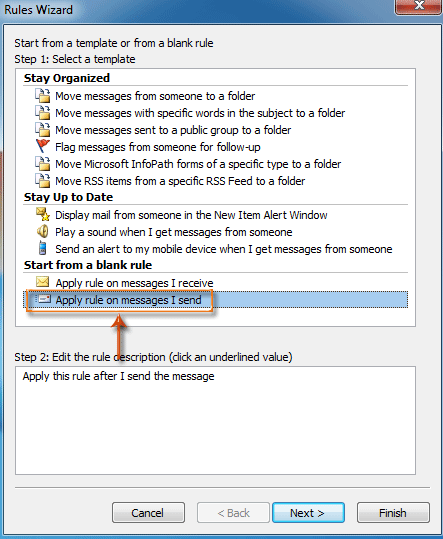
Paso 3: en el cuadro de diálogo Asistente de reglas, seleccione y resalte Aplicar regla a los mensajes que envíe en la sección Empezar con una regla en blanco y haga clic en el botón Siguiente.
Paso 4: en el nuevo cuadro de diálogo Asistente de reglas,
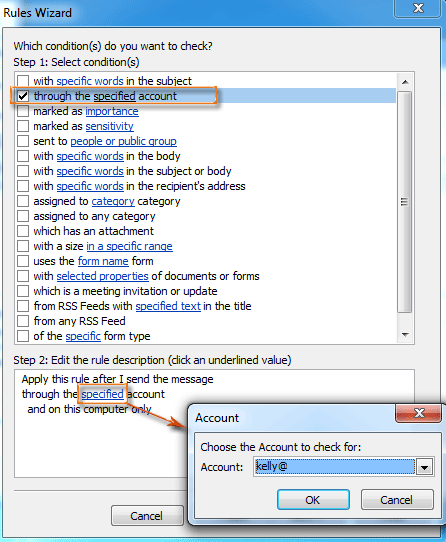
- Marque la opción a través de la cuenta especificada en la sección Paso 1: seleccione condición(es).
- Haga clic en especificado en la sección Paso 2: edite el contenido de la regla.
- En el cuadro de diálogo Cuenta que aparece, seleccione una cuenta en el campo Cuenta: y haga clic en el botón Aceptar.
- Haga clic en el botón Siguiente.
Paso 5: en el nuevo cuadro de diálogo Asistente de reglas,
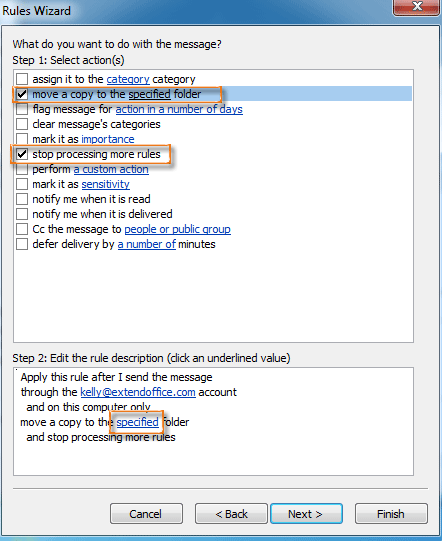
- Marque la opción mover una copia a la carpeta especificada y la opción dejar de procesar más reglas en la sección Paso 1: seleccione acción(es).
- Haga clic en especificado en la sección Paso 2: edite el contenido de la regla.
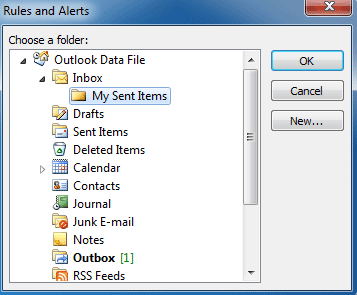
- En el cuadro de diálogo Reglas y alertas, seleccione una carpeta y haga clic en el botón Aceptar.
- Haga clic en el botón Siguiente.
Paso 6: continúe haciendo clic en los botones Siguiente y en el botón Finalizar en los siguientes cuadros de diálogo.
A partir de ahora, todos los mensajes de correo electrónico enviados se guardarán automáticamente en la carpeta que configuró en el paso 5.
Las mejores herramientas de productividad para Office
¡Descubra el nuevo Kutools para Outlook con 100+ funciones increíbles!¡Haga clic para descargar ahora!
📧Automatización de correo electrónico: Respuesta automática (disponible para POP e IMAP) / Programar el envío de correos electrónicos / CC/BCC automático según reglas al enviar correos / Reenvío automático (regla avanzada) / Añadir saludo automáticamente / Dividir automáticamente los correos con múltiples destinatarios en mensajes individuales...
📨Gestión de correo electrónico: Recupera tus correos electrónicos / Bloquea correos fraudulentos por asunto y otros criterios / Elimina correos electrónicos duplicados / Búsqueda avanzada / Organiza tus carpetas…
📁Archivos adjuntos Pro: Guardar en lote / Desvincular en lote / Comprimir en lote / Guardar automáticamente / Desconectar automáticamente / Auto comprimir...
🌟Magia de la interfaz: 😊Más emojis bonitos y modernos / Le avisa cuando llegan correos importantes / Minimiza Outlook en lugar de cerrarlo…
👍Maravillas con un solo clic: Responder a Todos con Adjuntos / Correos electrónicos antiphishing / 🕘 Mostrar zona horaria: hora actual del remitente...
👩🏼🤝👩🏻Contactos y calendario: Crear contactos en lote a partir de correos seleccionados / Dividir un grupo de contactos en grupos individuales / Eliminar recordatorio de cumpleaños...
Utilice Kutools en su idioma preferido: compatible con inglés, español, alemán, francés, chino y más de 40 idiomas adicionales.


🚀 Descarga con un solo clic — Obtenga todos los complementos de Office
Muy recomendado: Kutools for Office (5 en 1)
Un solo clic para descargar cinco instaladoresa la vez —Kutools para Excel, Outlook, Word, PowerPointy Office Tab Pro.¡Haga clic para descargar ahora!
- ✅Comodidad con un solo clic: Descargue los cinco paquetes de instalación de una sola vez.
- 🚀Listo para cualquier tarea de Office: Instale los complementos que necesite, justo cuando los necesite.
- 🧰Incluido: Kutools para Excel / Kutools para Outlook / Kutools para Word / Office Tab Pro / Kutools for PowerPoint